I’m a big fan of automated unit testing. I don’t always develop test-first, but I do always try to make sure I end up with a good set of tests for whatever code I’m writing. For JavaScript (in the browser), I’ve settled on QUnit as my unit testing framework of choice. It’s easy to use and works well.
Ideally, you’ll have tests that cover every part of the code. For some projects, it’s pretty easy to tell when this is the case. But if you find yourself writing tests for a complex piece of code that didn’t have many (or any) tests beforehand, as I did recently, then it can be good to know exactly how much of the code is being tested, and which bits still need to be exercised through tests. This is where a code coverage tool comes in.

I recently tried out blanket.js for this, and it worked really well. It integrates with QUnit and outputs the code coverage information directly on the page containing your test results. Together these two tools provide a simple and powerful combination for ensuring that your JavaScript code is well tested.
If you’re using QUnit, you’ll already have a test page that references all the JavaScript files you’re using, including QUnit itself. You just need to add a reference to where the blanket.js file is on your system:
<script src="blanket.min.js"></script>
Make sure you do this after the reference to QUnit, as it requires some things that are defined by QUnit.
You also need to tell blanket which files you want to get coverage information for. You do this by adding a data-cover attribute to the script element:
<script src="some-code-file.js" data-cover></script>
If your test page gets served up by a web server then you’re good to go. If you load it directly from a file, as I often do, then you’ll run into the issue that browser security policies prevent it from accessing local files. Blanket needs to load the contents of local files so that it can show you which lines of code have not been covered by the tests. In Chrome you can get around this by starting it with the option “–allow-file-access-from-files”. I set up a shortcut for this on my desktop so I can run blanket-covered tests more easily.
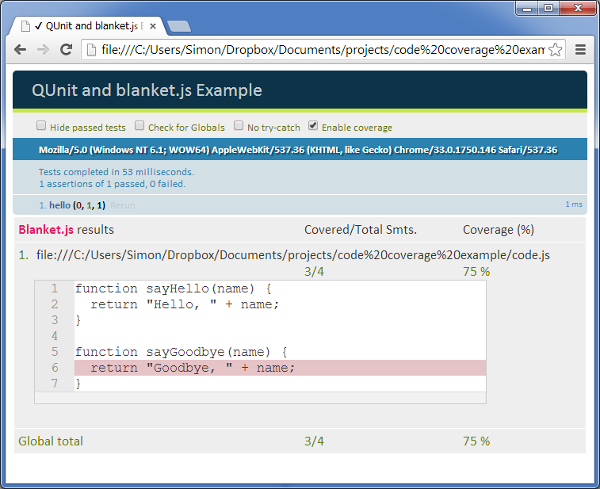
Once all that is done, you can load the test page in your browser and view the results. You’ll notice that an “Enable coverage” checkbox has appeared at the top, next to the other checkboxes that QUnit displays. Checking this will display a code coverage panel showing you the files and how much of the code was covered.

Clicking on a file name displays the source, with lines of code that weren’t executed highlighted. Now you can figure out what additional tests you need to write to ensure that all of the code is executed by the tests. In this case it shows that my sayGoodbye function isn’t being executed, so I clearly need to write a test that calls this.
I’ve put together a really simple example using QUnit and blanket.js to test some JavaScript code, which you can download here.